New Monthly Offering!

Whoooo are we foolin’? We know starting new projects is always more fun than putting the finishing touches on an old project, especially when the new project is small and can be done in just a few days. Better still when the project can be done by hand making it portable in addition to being cute. Such is the case with our new monthly offering, Little Quilts Squared. Each month we will kit a new project that will result in a 12” square that can be hung on a table top stand or from a freestanding hanger. Each option allows you to use your space to its best advantage.

“What if I don’t like small projects?” you ask. “Can I stitch the squares together into a quilt or seasonal wallhangings?” Absolutely! This is your project so you can do with it as you please. While you’re stitching the monthly blocks just be thinking about how you want to put them together at the end of the year. There are several options I can think of and will be happy to share my ideas with you when you ask.

The kits will be ready on the first Saturday of the month, even after the brick and mortar portion of the shop closes on October 1. We will be one month ahead of Pic-September-Owlschedule so that you can get your project done in time to hang it for the appropriate month. For example, this past Saturday was the first day of this program, so the first kit we put together was for the September project which has a little owl sitting on a branch in the light of the moon. In September, we’ll have the kit ready for the October project and so on. The kits will come complete with everything you need to finish the project with the exception of threads, batting (great time to use up scraps), and fusible webbing.

One complaint I’ve heard over the years with regards to kitted BOMs is from folks who don’t want their project to look like everyone else’s. Granted, unless the only folks you know are ones who do the same project and visit your house on a regular basis, how many others are even going to know that your project looks like that of someone else? But, because of that complaint, I usually try to figure out ahead of time whether or not a project is adaptable, and these definitely will be. With a little thought, there are always lots of ways to make your project uniquely your own. Here are some ideas for you to ponder if you’re one of those people.

Around here, we’re oftentimes bad about using the pattern as a guide and then doing our own thing. Do you ever do that? I must confess that we did just that with this little owl. Each of the patterns in this year-long BOM were designed with a pieced background. BUT, I had this great night sky fabric stashed away that we thought would work equally well and save the time of cutting and piecing the background. Since the moon covers up so much of the pieced background, I didn’t think it would make too much of a difference in the overall look. Ptrn-TWBL09-Sept-CrpdHere’s a photo of the pattern the way the designer meant it to be. What do you think? As always, if you’d prefer to have a pieced background you can pull from your stash, piece the background, and save the kit fabric for use in something else later. If you do decide you’d rather have a pieced background, you might want to consider piecing the top and bottom rows while leaving the middle row as one strip since the block in the middle isn’t even seen. I really do like the look of the pieced background, but if I’m going to do the work I want y’all to be able to see it.

Something else you might want to consider doing to change your owl up a bit is using a large white button, a yo-yo, or a fuzzy pom-pom on the top of his hat. Same goes with his eyes. We used buttons because that’s what the designer did and we already had them on hand. You could use regular black fabric if you’d rather or again, make small yo-yos. Victoria stitched the eyes on but didn’t want her owl to be cross-eyed like the one in the pattern. By moving the black portion of his eyes around, you can give your owl lots of different expressions.

When Miss Martha drew off the pattern pieces onto Heat ‘n Bond, she missed one of the three leaves. Victoria was doing the stitching because Miss Martha wasn’t able to and decided to leave our branch with just two leaves instead of three. I don’t think the missing leaf detracts from the finished project one bit. The leaves have a lot of little “fingers” on them so stitching them does take a while which was another reason Victoria was fine with only having two leaves. I didn’t go back and check the kits, but I’m thinking there may be only enough fabric for two leaves. If you want to include the third leaf you’ll probably need to find a green scrap from your stash.

We had pine cone fabric on hand and used that instead of embroidering all the little scallops like the designer did to make her pine cones. If we can find a way to cut down on the amount of work required to finish a project, you can bank on us doing it every time.

So see! There are four things we did differently on our sample to make our owl uniquely ours. We changed the number of leaves, the orientation of the eyes, the pine cones, and eliminated the pieced background. I think our owl still looks just as cute too.

Beginner friendly – If you have a young person, or even someone older, who would like to start creating with their hands, this is a good project on which to start them. The appliqué pieces are large, the fabrics are already put together, and since they can stitch by hand they won’t even need to invest in a machine if they don’t already have one. Of course, it is easier to attach the binding by machine so they may want you to do that for them, or they could skip the binding and use the envelope turn technique instead to finish their project. You might still need to stitch it all together for them to turn, but they’ll be able to save learning about binding for another time. Then again, there’s no time like the present.

If you’re a newbie who wants to learn, we give a free lesson with the purchase of the kit and commitment to the year long program. Each kit is $17.95 and can be picked up at the shop or purchased in our shop on Etsy. I’ve not yet figured out how to set up recurring monthly charges through PayPal. If you’d like to have me ship your kit at the beginning of each month you’ll need to call the shop and we can discuss payment and shipping options. At present, the number of kits is limited so do let me know if you wish to participate.

I’m probably dating myself here, but from the first time I saw this little owl I thought about Woodsy. Are you old enough to remember him? He used to come on TV and say, “Give a hoot! Don’t pollute!” Funny the things you remember when working on your quilting projects…

There’s Still Time!

Proj-2015-Rudy
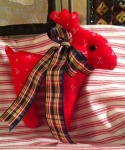
Need a really quick and cute project to make before Christmas Day? We have just the thing for you then. This little stuffed reindeer can be made in just a few hours, and you probably already have everything you need on hand.  Is he not the cutest thing?!  And at about 6-1/2″ tall he’s small enough to fit into a little a little basket or on the branches of your tree.

As with most projects I do using someone’s pattern, I don’t follow it to the letter. In this case, rather than using freezer paper to make my template I just made a copy of the pattern and cut the reindeer out on the outside edge of the black line. I placed my fabric with right sides together (or print sides together for those who know there is no wrong side to any piece of fabric as both can be used equally well by those who are willing to do so) and pinned the pattern to my fabric. I then sewed along the edge of the paper pattern, cut away the excess fabric ¼” from the stitching, and snipped the curves so it would lay well once turned inside out. There were a couple of places where I stitched through the pattern, but I was able to pull the edge of the pattern out from under those stitches and can use it again to make more reindeer if I so desire.

I gave my little reindeer button eyes and a ribbon that was a bit narrower than the one specified by the designer. The designer by the way is none other than Miss Anne of Bunny Hill Designs. The little snowman in the mitten that I shared in a previous post is also from Bunny Hill Designs. Yes, you might say we like her designs quite well and have lots of her patterns in the shop. Not all have been made into samples mind, but we do love her work.

Proj-Snowman Candle MatWhile I was stitching my little reindeer by machine, Miss Martha was stitching a candle mat in wool felt by hand. It turned out quite nicely, but I’m not sure I want to hide the snowman’s face in the Proj-Snowman Candle Mat CU
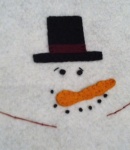
middle by actually putting a candle on it. It might just have to lie around and decorate instead of making itself useful being what it’s supposed to be.  I mean, look at him, would you want to cover up that cute, cute, cute smiling face?   This mat is a nice size, around 11″ give or take.  It still needs three little buttons going down the front of the center snowman according to the pattern by Penny Lane Primitives… or does it?  Our wool felt is the good kind and comes from National Nonwovens.  We love this product so well that we have close to 50 different colors on the bolt.

We will be making kits for the snowman candle mat and could easily put one together for the reindeer as well if you need it.  Patterns at present are limited, so let me know if you want one, or both.  Since you’re coming down to the wire where making handmade gifts is concerned, a kit will make it much quicker to accomplish your goal of giving nothing store boughten, as the old folks around here use to say.


New Projects and Giveaway Winner!

First, I’d like to announce the winner of the sweet sixteens set I used to make the first block of Moda’s Sampler Block Shuffle. Now the winner can make one just like mine, or some variation thereof. The winner is…Janet! Congratulations Janet! While I didn’t say you had to use your new fabrics to make this first block, I do hope to see something that you’ve used them in…eventually.

Now, on to our projects. Miss Martha has been keeping herself busy making new samples for the shop. The latest two are both geared to winter which is fast approaching. The first project I’d like to share with you is actually the last of 12 in the With Thy Needle series that we’ve been doing this year. These are made from wool felt, and we do have kits for each month available if you didn’t participate but would like to. Just give me a call and I’ll put a set aside for you.
Pic-December
This last installment showcases a boot which has been filled with holly, greenery, and candy canes. It can hang from a background designed to be changed out each month, made into a wall hanging, or framed. It could also be turned into a small pillow or hung from a wire hanger. At only 8″ square you won’t need much room to display your handiwork once finished.

The second little project is just too cute! Made from wool felt, and measuring around 4″x7″, you can whip this up in no time. Not only is it quick, but it is a very versatile project as well. So, just how versatile is it? Well, let me clue you in.
Pic-BHill-Snowman in Mitten
The original intent is of course as a tree ornament. However, you don’t have to just hang it on a tree because you could just as easily hang it on the door knob of a kitchen or bathroom cabinet, or the knob on a dresser in a child’s bedroom. Anywhere you’d like to put a little color and cute into your décor would work.

Maybe you’re not one to buy lots of presents and have gotten into the habit of buying gift cards instead. Let’s face it, when you have teenagers on your list it’s usually the best way to go these days. If that’s the case, you could make just the mitten and put the gift card inside. That way they get two gifts in one. They can still hang the mitten on the tree to enjoy long after the gift card has been used up. You could even include the date on the back of the cuff or stitch the recipients name to the front of the cuff in the event you make multiple mittens for the same family. You could also include the snowman if you’d like depending on how much time you have to work with and whether or not you think the recipient would appreciate your efforts. A gift card could easily slid in behind him.

The snowman isn’t attached to the mitten. This means that he can be made as a stand alone ornament by attaching a small loop to the back of his head. Better yet, why not make him into a pin that can be worn all winter long on a coat, toboggan, or purse. Snowmen can be displayed and enjoyed for several months you know.

Maybe you have smaller folks for which to make gifts. This little snowman would make a great finger puppet by leaving the bottom open. With a little imagination you could make a whole snowman family. Make two snowmen the size given in the pattern for a mom and a dad and then shrink the pattern just a bit and make a brother and sister, or maybe one for each member of the family that you gift the puppets to depending on the family’s configuration. What better way to foster a child’s imagination than with finger puppets?

We have a couple of kits ready to go with plans on making more as soon as we get more patterns. If you think you need help making this project, we can set up a time for you to work one-on-one with Miss Martha at no extra charge. While this project is something you could do in an evening or two, especially with all the fabrics on hand, you don’t want to wait too long to get started. I mean, who’d of thought it would be November already!? That means December is fast approaching and will be here before we’re ready. I know that for a fact because it always does. Agreed?

A Dog and Roses

As mentioned before, one of the questions I get asked most often by those who visit is, “What are you working on?” I never have anything large to show off, but I can manage a small something every now and then. My latest small something is a mug rug with Wilson on it. Wilson is a real dog owned by the pattern designer, Cindy Staub. In a recent blog post she revealed that Wilson has gone blind. You can read about him here. I had already started working on Wilson when the post was published and was just waiting on a new bolt of fabric to come in that I wanted to use for the binding. Of course, it took me a week after it was delivered to get around to cutting it and sewing it into place. You know how that is…
Wilson
If you would like to make a mug rug with Wilson on it, I’ve made up a few kits which include the already cut binding. All you have to add is your favorite fusible web and a little bit of batting. This is a quilt-as-you-go project so once you have the appliqué stitched in place all you have left to do is bind it. I use rayon thread matched to the colour of each fabric piece when doing my machine appliqué because I like the look I get. I’m not big into the heavy folk art look which is why I don’t use black thread or floss on everything. The bonus to using matching rayon thread is that it tends to hid any bloopers I might make along the way. If I used black, those bloopers would stick out like a sore thumb, and I’d have to re-do the offensive area which would add the expenditure of extra time and energy to my project. Given that I have little of either I don’t want to take a chance by using a contrasting thread. I use regular silk-finish in the bobbin to match my backing fabric.

If you like handwork, you can easily do this design by hand as well. All you have to do is decide whether or not you want to go through all three layers like Victoria does when she’s doing her embroidery work, or just through the top layer and quilt the project once the top is finished. I think it would look just as good done by hand as by machine to be quite honest with you. Plus, you’d have the added bonus of portability since it’s only about 7-1/2″x10-1/2″ overall.

I’ve really gotten kind of hooked on mug rugs. I think because I like small quilting projects to begin with. When you add the fact that mug rugs are useful as well as decorative it just turns in to a win-win situation. If you’re looking for a small project to give someone as a gift you can’t go too wrong with a mug rug, a great mug that fits the recipient’s personality (look at TJMaxx, Home Goods, or Marshall’s for these), and some coffee or tea (which you can find there as well) depending on their preference.

Speaking of handwork, if you enjoy it as much as we do you need to go to Jenny’s blog and sign up to get her newsletter right this minute. Starting Friday, and I think she’s a day ahead of us since she’s in Australia, she will have a set of 10 new designs called Rosedaisy Designs to release as a PDF download for $24.95. If you hurry, you can save $5 on these designs. I bought mine yesterday! Starting on June 20 she will share a free tutorial each month for a project that uses one of the 10 blocks. If you want to make the projects, and her projects are always super, you’re going to have to have the patterns. So, go here right this very second, even before you finish reading this post, and get your set of patterns. They’re the first ones on the left that show up. There’s even an 11th pattern that she gives you as a bonus. She’s a very generous and gifted lady. If you don’t already have an account on Craftsy you’ll need to register. Once registered, you can buy her patterns, e-magazine, and even enjoy several freebies in her store as well as others. Like I said though, you need to do it quickly. Come 10:00 a.m. Friday morning, Australian time, those patterns will cost you $5 more. Even so, there are 34 pages to this one pattern set so they’re well worth it!

My last bit of time-sensitive news is for those of us who also enjoy crochet, probably even knitting if I were to take a guess. Don’t ask me how I ended up at this site because I really can’t tell you. I think maybe the good Lord had His hand in guiding me to it, as happens quite often you know. Suffice it to say, I was amazed that this site has information on a need that those of us in this area can relate to. Kristi Simpson of RAKJ Patterns is hosting a chemo cap drive. Go here and scroll down a couple of posts to the one on May 23 (that was my birthday by the way) to read all about it. She wants to gather no less than 550 hats to be given to children who are enduring the painful process of chemo treatments. The drive appears to run from June 1 to July 31 with hats to be delivered at the end of each month to the St. Jude Clinic at Huntsville Hospital in Huntsville, AL. When you sign up to donate hats, you will be sent two patterns that can be used, but as I understand it you can use any pattern that you might already have that would work for children sizes six months to 12 years. The site specifically mentions crocheted hats, but as I said before, I don’t think they would turn down knitted ones if you have some on hand already or can make them quickly. If you live far, far away you can still sign up, get the patterns, make hats, and donate them to your local cancer center. All you have to do is take a photo of your creations and e-mail it to the address given on her site to be included in the count. I’ve already told Victoria to sign herself up as she’s getting pretty good at crocheting. You should see the great pair of slippers she made me. They’re soooo warm…

So get your needles out, and let’s start stitchin’!

Enter your email address to subscribe to this blog and receive notifications of new posts by email.

Join 122 other subscribers